In this tutorial, we will see how to make HTTP Get request to OpenWeatherMap API from ESP32 using ESP-IDF. We can design a sensorless weather station with OpenWeatherMap to get weather conditions, including temperature, pressure, humidity, wind speed and direction, cloudiness, and precipitation.

We will use HTTP client library available in ESP-IDF to make HTTP Get requests to OpenWeatherMap API.
We will program ESP32 with ESP-IDF in VS Code. Before we move ahead, make sure you have the latest version of VS Code installed on your system with the ESP-IDF extension configured.
OpenWeatherMap API Introduction
The OpenWeatherMap API provides a variety of weather data for different locations including current weather conditions, weather forecasts, historical weather data, and weather maps. The following information is available:
- Current weather conditions, including temperature, pressure, humidity, wind speed and direction, cloudiness, and precipitation.
- Weather forecasts for up to 16 days, with data for temperature, pressure, humidity, wind speed and direction, and precipitation.
- Historical weather data, including temperature, pressure, humidity, wind speed and direction, and precipitation for a specified date.
- Weather maps, including temperature, precipitation, wind, pressure, and clouds for different regions of the world.
In addition to the basic weather data, the OpenWeatherMap API also provides information about the sunrise and sunset times, UV index, and air pollution levels for a specific location.
Using OpenWeatherMap API

Visit the API page at https://openweathermap.org/appid/. Once the webpage has loaded, you will be presented with a window. To sign up, click on the “here” link, which is indicated by the red box.

On the page you will be redirected to, you will need to fill in your username, password, and other required information to create your account. After filling in all the details, check the necessary boxes and then press the “Create Account” button to finalize the process.

After confirming the email, a message will be displayed indicating that your account has been created successfully.

The next step is to navigate to the “API keys” tab, where you will find a window displaying your unique API key.

Your unique API key, highlighted in red, will be displayed in the “API keys” tab. It’s important to save this key securely and not share it with anyone for security purposes.
How to Use OpenWeatherMap API
Now that we have created our account with OpenWeatherMap and obtained our unique key, let’s see how to retrieve weather updates for a specific location. To do this, simply type the following URL into a new tab:
http://api.openweathermap.org/data/2.5/weather?q=your_city, your_country_code&APPID=your_unique_API_keyThe URL requires the input of three parameters to acquire the weather update for a desired location. These parameters include the name of the city (specified as “q=your_city”), the country code of the city (specified as “your_country_code”), and your unique API key (obtained from the “API keys” tab).
As an example, if we want to obtain the weather information for Seoul in South Korea, we can type the following URL:
http://api.openweathermap.org/data/2.5/weather?q=Seoul,KR&APPID=68de4b6c1e6--------------b4213a2Open a new window and paste the URL. The weather report for Seoul, South Korea at the current moment will appear with all its details.

As shown in the above figure, the HTTP response is in JSON format. We will parse this JSON message in ESP32 ESP-IDF code to get temperature, pressure, and humidity.
Create ESP32 ESP-IDF Project for OpenWeatherMap API Sensorless Weather Station
In this section, let’s create an ESP-IDF project for OpenWeatherMap API Sensorless Weather Station.
Open your VS Code and head over to View > Command Palette. Type ESP-IDF: New Project in the search bar and press enter.
Specify the project name and directory. We have named our project ‘esp32_openweathermap_api.’ For the ESP-IDF board, we have chosen the custom board option. For ESP-IDF target, choose ESP32 module. Click ‘Choose Template’ button to proceed forward.

In the Extension, select the ESP-IDF option:

We will click the ‘sample_project’ under the get-started tab. Now click ‘Create a project using template sample_project.’

You will get a notification that the project has been created. To open the project in a new window, click ‘Yes.’
This opens the project that we created inside the EXPLORER tab. There are several folders inside our project folder. This is the same for every project which you will create through ESP-IDF Explorer.
ESP32 ESP-IDF OpenWeatherMap API Sensorless Weather Station Code
This ESP32 ESP-IDF code retrieves weather data from OpenWeatherMap API, processes it, and outputs the temperature, pressure, and humidity of a specific city. It uses the HTTP client library for making HTTP GET requests to the API and processing the response.
It processes the HTTP GET response from OpenWeatherMap API by extracting the relevant data, The response is a JSON message. It parses the JSON string, extracts the values for temperature, pressure, and humidity, and displays them to the console.
#include <stdio.h>
#include <string.h>
#include <stdlib.h>
#include "esp_log.h"
#include "nvs_flash.h"
#include "esp_event.h"
#include "esp_netif.h"

#include "freertos/FreeRTOS.h"
#include "freertos/task.h"
#include "esp_system.h"

#include "esp_http_client.h"
#include "connect_wifi.h"
#include <cJSON.h>

static const char *TAG = "HTTP_CLIENT";

// API key from OpenWeatherMap
char open_weather_map_api_key[] = "replace_with_your_api_key";

char city[] = "Lahore";
char country_code[] = "PK";

#define HTTP_RESPONSE_BUFFER_SIZE 1024

char *response_data = NULL;
size_t response_len = 0;
bool all_chunks_received = false;


void get_temp_pressure_humidity(const char *json_string)
{

    cJSON *root = cJSON_Parse(json_string);
    cJSON *obj = cJSON_GetObjectItemCaseSensitive(root, "main");

    float temp = cJSON_GetObjectItemCaseSensitive(obj, "temp")->valuedouble;
    int pressure = cJSON_GetObjectItemCaseSensitive(obj, "pressure")->valueint;
    int humidity = cJSON_GetObjectItemCaseSensitive(obj, "humidity")->valueint;
    printf("Temperature: %0.00f°F\nPressure: %d hPa\nHumidity: %d%%\n", temp, pressure, humidity);

    cJSON_Delete(root);
    free(response_data);
}

esp_err_t _http_event_handler(esp_http_client_event_t *evt)
{
    switch (evt->event_id) {
        case HTTP_EVENT_ON_DATA:
            // Resize the buffer to fit the new chunk of data
            response_data = realloc(response_data, response_len + evt->data_len);
            memcpy(response_data + response_len, evt->data, evt->data_len);
            response_len += evt->data_len;
            break;
        case HTTP_EVENT_ON_FINISH:
            all_chunks_received = true;
            ESP_LOGI("OpenWeatherAPI", "Received data: %s", response_data);
            get_temp_pressure_humidity(response_data);
            break;
        default:
            break;
    }
    return ESP_OK;
}


void openweather_api_http(void *pvParameters)
{

    char open_weather_map_url[200];
    snprintf(open_weather_map_url,
             sizeof(open_weather_map_url),
             "%s%s%s%s%s%s",
             "http://api.openweathermap.org/data/2.5/weather?q=",
             city,
             ",",
             country_code,
             "&APPID=",
             open_weather_map_api_key);

    esp_http_client_config_t config = {
        .url = open_weather_map_url,
        .method = HTTP_METHOD_GET,
        .event_handler = _http_event_handler,
    };

    esp_http_client_handle_t client = esp_http_client_init(&config);
    esp_http_client_set_header(client, "Content-Type", "application/x-www-form-urlencoded");

    esp_err_t err = esp_http_client_perform(client);

    if (err == ESP_OK)
    {
        int status_code = esp_http_client_get_status_code(client);
        if (status_code == 200)
        {
            ESP_LOGI(TAG, "Message sent Successfully");
        }
        else
        {
            ESP_LOGI(TAG, "Message sent Failed");
        }
    }
    else
    {
        ESP_LOGI(TAG, "Message sent Failed");
    }
    esp_http_client_cleanup(client);
    vTaskDelete(NULL);
}

void app_main(void)
{
	esp_err_t ret = nvs_flash_init();
	if (ret == ESP_ERR_NVS_NO_FREE_PAGES || ret == ESP_ERR_NVS_NEW_VERSION_FOUND)
	{
		ESP_ERROR_CHECK(nvs_flash_erase());
		ret = nvs_flash_init();
	}
	ESP_ERROR_CHECK(ret);
	connect_wifi();
	if (wifi_connect_status)
	{
		xTaskCreate(&openweather_api_http, "openweather_api_http", 8192, NULL, 6, NULL);
	}
}
How Code Works?
These lines of code include several headers such as “stdio.h”, “string.h” and “stdlib.h” which provide basic input/output operations, string manipulation, and memory allocation functions respectively.
It also includes headers specific to the ESP32 microcontroller such as “esp_log.h”, “nvs_flash.h”, “esp_event.h” and “esp_netif.h”. These headers provide functions for logging, non-volatile storage, event handling, network interface management and to parse JSON messages.
#include <stdio.h>
#include <string.h>
#include <stdlib.h>
#include "esp_log.h"
#include "nvs_flash.h"
#include "esp_event.h"
#include "esp_netif.h"

#include "freertos/FreeRTOS.h"
#include "freertos/task.h"
#include "esp_system.h"

#include "esp_http_client.h"
#include "connect_wifi.h"
#include <cJSON.h>
Define global variables such as open_weather_map_api_key is the API key from OpenWeatherMap. The location to retrieve weather information for a defined city and country code in the global variables city and country_code.
// API key from OpenWeatherMap
char open_weather_map_api_key[] = "replace_with_your_api_key";

char city[] = "Lahore";
char country_code[] = "PK";
OpenWeatherMap API HTTP Get Request Function
The openweather_api_http() function is the main function that performs the HTTP client functionality. The function initializes the client, sets the headers, and performs the request to the OpenWeatherMap API. It calls the get_temp_pressure_humidity function to parse the received data and display the information.
void openweather_api_http(void *pvParameters)
Declares a character array open_weather_map_url of size 200, which is used to store the URL for the OpenWeatherMap API endpoint to make an HTTP GET request.
char open_weather_map_url[200];
Constructs the URL for the OpenWeatherMap API endpoint by concatenating the various string literals and the values of the city,country_code, and open_weather_map_api_key. The result is stored in the open_weather_map_url array.
    snprintf(open_weather_map_url,
             sizeof(open_weather_map_url),
             "%s%s%s%s%s%s",
             "http://api.openweathermap.org/data/2.5/weather?q=",
             city,
             ",",
             country_code,
             "&APPID=",
             open_weather_map_api_key);
Declares a structure config of type esp_http_client_config_t and initializes it with the values of the open_weather_map_url variable, HTTP_METHOD_GET, and address of HTTP response handler function. The _http_event_handler callback will trigger whenever we get a response from OpenWeatherMap API after making an HTTP GET request.
  esp_http_client_config_t config = {
        .url = open_weather_map_url,
        .method = HTTP_METHOD_GET,
        .event_handler = _http_event_handler,
    };
Call the esp_http_client_init function, passing it a pointer to the config structure, and stores the resulting client handle in the client variable.
esp_http_client_handle_t client = esp_http_client_init(&config);Calls the esp_http_client_set_header function, passing it the client handle and a string literal, to set the value of the Content-Type header for the request.
esp_http_client_set_header(client, "Content-Type", "application/x-www-form-urlencoded");Finally, performs the HTTP request using the esp_http_client_perform() function, and assigns the result to the err variable.
esp_err_t err = esp_http_client_perform(client);At the end code check whether the err variable equals ESP_OK or not which checks if HTTP request to OpenWeatherMap API was successful or not. If err equals ESP_OK, the code checks the status code of the response. If the status code is 200, print a message indicating that the HTTP request was sent successfully. If the status code is not 200, print a message indicating that the HTTP request failed.
If err does not equal ESP_OK, that means the HTTP request was not successful and prints a message indicating that the message was sent failed.
The esp_http_client_cleanup function is called to free the resources associated with the client variable. The vTaskDelete(NULL) function is called to delete the current task.
if (err == ESP_OK)
    {
        int status_code = esp_http_client_get_status_code(client);
        if (status_code == 201)
        {
            ESP_LOGI(TAG, "Message sent Successfully");
        }
        else
        {
            ESP_LOGI(TAG, "Message sent Failed");
        }
    }
    else
    {
        ESP_LOGI(TAG, "Message sent Failed");
    }
    esp_http_client_cleanup(client);
    vTaskDelete(NULL);
In summary:
This openweather_api_http function performs an HTTP GET request to the OpenWeatherMap API to retrieve weather information. The URL for the API request is constructed by concatenating several strings, including the API endpoint, city, country code, and an API key. The request is configured using an esp_http_client_config_t struct and initialized with esp_http_client_init(). The request is then set with a content type header before being sent with esp_http_client_perform(). The status code of the response is checked to determine if the request was successful or not.
OpenWeatherMap API HTTP Response Handler Function
This _http_event_handler is an event handler function for HTTP events. It handles two main events – “HTTP_EVENT_ON_DATA” and “HTTP_EVENT_ON_FINISH”.
The HTTP_EVENT_ON_DATA is trigged when ESP32 gets an HTTP request response from OpenWeatherMap API. Multiple chunks are used in HTTP communication use multiple chunks to handle larger amounts of data, as it may not be possible to receive all the data in a single request. By using multiple chunks, the data can be split into smaller manageable pieces, reducing the risk of running out of memory or other errors. This handles the HTTP_EVENT_ON_DATA event by allocating memory and copying the received data chunk into a buffer.
case HTTP_EVENT_ON_DATA:
            // Resize the buffer to fit the new chunk of data
            response_data = realloc(response_data, response_len + evt->data_len);
            memcpy(response_data + response_len, evt->data, evt->data_len);
            response_len += evt->data_len;
            break;
When the event “HTTP_EVENT_ON_FINISH” is triggered, it means that all the data chunks have been received. The code logs the complete received data and calls a function “get_temp_pressure_humidity” with the received data as an argument.
case HTTP_EVENT_ON_FINISH:
            all_chunks_received = true;
            ESP_LOGI("OpenWeatherAPI", "Received data: %s", response_data);
            get_temp_pressure_humidity(response_data);
            break;
Get Weather Station Values Function
This get_temp_pressure_humidity function takes in a JSON string as input and extracts the values for temperature, pressure, and humidity from the JSON string.
void get_temp_pressure_humidity(const char *json_string);The function uses the cJSON library to parse the JSON string and extract the values of temperature, pressure, and humidity from the JSON data. The values are then printed out in a specific format, which includes the temperature in Fahrenheit, pressure in hPa, and humidity as a percentage.
cJSON *root = cJSON_Parse(json_string);
cJSON *obj = cJSON_GetObjectItemCaseSensitive(root, "main");

float temp = cJSON_GetObjectItemCaseSensitive(obj, "temp")->valuedouble;
int pressure = cJSON_GetObjectItemCaseSensitive(obj, "pressure")->valueint;
int humidity = cJSON_GetObjectItemCaseSensitive(obj, "humidity")->valueint;
printf("Temperature: %0.00f°F\nPressure: %d hPa\nHumidity: %d%%\n", temp, pressure, humidity);
After extracting the values, the function deletes the cJSON object and frees up the memory used for storing the response data.
cJSON_Delete(root);
    free(response_data);
Main App Function
The “app_main” is the entry point of the application. It initializes the Non-Volatile Storage (NVS) flash on the ESP32 microcontroller, which is used to store data that needs to survive a power cycle. After that, it calls “nvs_flash_init” to initialize the NVS flash and checks the return value. If the return value is “ESP_ERR_NVS_NO_FREE_PAGES” or “ESP_ERR_NVS_NEW_VERSION_FOUND”, it means that the NVS flash needs to be erased and initialized again. Then calls “ESP_ERROR_CHECK” to check if there is an error with the NVS flash initialization.
esp_err_t ret = nvs_flash_init();
	if (ret == ESP_ERR_NVS_NO_FREE_PAGES || ret == ESP_ERR_NVS_NEW_VERSION_FOUND)
	{
		ESP_ERROR_CHECK(nvs_flash_erase());
		ret = nvs_flash_init();
	}
	ESP_ERROR_CHECK(ret);
Connects to a wifi network by calling the “connect_wifi()” function.
connect_wifi();
If the wifi connection is successful, it creates a task “openweather_api_http” which makes an HTTP Get request to OpenWeatherMap API.
if (wifi_connect_status)
	{
		xTaskCreate(&openweather_api_http, "openweather_api_http", 8192, NULL, 6, NULL);
	}
Note: there is one header file with the name of “connect_wifi.h” in this project, we have created this in previous tutorials. You also need to add that file. You can download complete project from next section download link.
ESP32 ESP-IDF OpenWeatherMap API Sensorless Weather Station Demo
In this section, we will see a demo of the OpenWeatherMap API Sensorless Weather Station. First of all, download the complete project from the following link and build the project.
Configure Wi-Fi Credentials
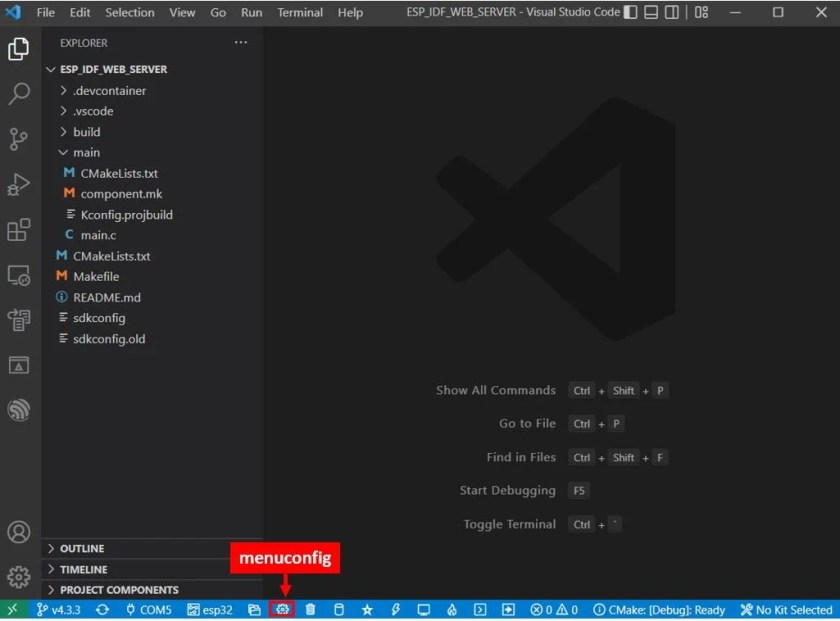
Now head over to the menuconfig. Click the icon shown below. It opens the ESP-IDF SDK Configuration Editor.
Scroll down and open the Example Configuration. Here we can set the configuration parameters for this example according to our needs. This includes the Wi-Fi SSID, Wi-Fi password, and Maximum retry number. Specify the Wi-Fi SSID and password of your router that the ESP32 board will connect to. By default, the maximum retries are set to 5. You can change it according to your preference. After specifying the configuration parameters, click the Save button on the top.

Disable ESP TLS
We are using HTTP instead of HTTPS therefore we need to disable the ESP-TLS component from settings->Components Config>ESP-TL.

To flash your chip, type the following command in the serial terminal. Remember to replace the COM port with the one through which your board is connected.
idf.py -p COMX flash monitor
After the code flashes successfully, you can view all the informational logs. First, the station Wi-Fi is initialized. Then we can view the esp_netif_handlers which includes the IP, mask, and gw addresses. Then we get the log “got IP” followed by the IP address which shows that ESP32 has successfully connected with your Wi-Fi network.
Now if everything works fine, you will see the temperature, pressure and humidity values printed on the console.

You may also like to read:
- ESP32 ESP-IDF Send Messages to WhatsApp Number
- ESP32 ESP-IDF Send Sensor Readings to ThingSpeak Cloud Platform
- ESP32 ESP-IDF Send SMS with Twilio
- ESP32 ESP-IDF SPIFFS Web Server
- ESP32-CAM ESP-IDF Live Streaming Web Server
- ESP32-CAM ESP-IDF Take Photos and Save into SD Card
- ESP32 ESP-IDF MQTT Publish BME680 Sensor Readings
We are a team of experienced Embedded Software Developers with skills in developing Embedded Linux, RTOS, and IoT products from scratch to deployment with a demonstrated history of working in the embedded software industry. Contact us for your projects: admin@esp32tutorials.com
Hi,
this example is wonderful. It function as your explanation.
Thank you very much.
best regards ude