In this tutorial, we will learn to create an ESP32 Web server using SPIFFS and ESP-IDF. ESP32 has an SPI flash file system that is used to store different types of data and files. In the last tutorial, we created an ESP32 web server where we hardcoded HTML/CSS responses inside our code as string literals. But in this tutorial, we will store HTML/CSS files in SPIFFS and create a web server which will provide these files in HTTP GET response to web clients.
In this ESP32 ESP-IDF SPIFFS web server project, we will create and store HTML and CSS files in SPI flash file system, and through which we will build a web server that will control the output GPIO pins of the ESP32 module by toggling the onboard LED.
We will program ESP32 with ESP-IDF in VS Code. Before we move ahead, make sure you have the latest version of VS Code installed on your system with the ESP-IDF extension configured.
How Does ESP32 ESP-IDF SPIFFS Web Server Work?
When any user try to access this web server through an IP address, ESP32 SPIFFS web server respond to this HTTP request with a simple HTML and CSS files that represents LED control buttons, LED status, title ‘ESP32 WEB SERVER’ and a lamp symbol. During program startup, HTML/CSS file content reads from SPI flash and save in a buffer.

We will create SPIFFS web server with HTTP web server library available in esp-idf. Moreover, we will create HTML and CSS files and store them in ESP32 SPIFFS. When a user will send a HTTP get request by entering the IP address on the web browser, an ESP32 will respond with a buffer which contains HTML and CSS files.
There are two buttons on the GUI that is “ON” button and “OFF” button. User will be able to control ESP32 GPIO through these buttons. With “ON” button URL redirects to an IP address followed by /led2on and similarly with “OFF” button, URL redirects to an IP address followed by /led2off. By using these sub paths of URL, we trigger a respective callback function inside our code to control an LED and send response to a web client.

Create ESP-IDF Project ESP32 SPIFFS Web Server
In this section, let’s create a ESP32 SPIFFS web server Work with ESP-IDF.
Open your VS Code and head over to View > Command Palette. Type ESP-IDF: New Project in the search bar and press enter.
Specify the project name and directory. We have named our project ‘esp32_spiffs_webserver.’ For the ESP-IDF board, we have chosen the custom board option. For ESP-IDF target, we have chosen ESP32 module. Click ‘Choose Template’ button to proceed forward.

In the Extension, select ESP-IDF option:

We will click the ‘sample_project’ under the get-started tab. Now click ‘Create project using template sample_project.’

You will get a notification that the project has been created. To open the project in a new window, click ‘Yes.’
This opens our esp32_spiffs_webserver project that we created inside the EXPLORER tab. There are several folders inside our project folder. This is the same for every project which you will create through ESP-IDF Explorer.
ESP-IDF Create Partition for SPIFFS
In this section, we will create a partition for SPIFFS to store HTML/CSS for web server.
Create a new file and name it as ‘partitions.csv.’ Copy the data given below in that file and save it. We want to add our own custom partition table hence we will be using this file.
# Name,   Type, SubType, Offset,  Size, Flags
# Note: if you change the phy_init or app partition offset, make sure to change the offset in Kconfig.projbuild
nvs,      data, nvs,     ,        0x6000,
phy_init, data, phy,     ,        0x1000,
factory,  app,  factory, ,        1M,
storage,  data, spiffs,  ,        1M
After creating the partitions.csv file, create a folder named ‘data‘ in project directory. Inside that folder create a text file named ‘index.html.’
This index.htm file defines the layout and content of a web page that which ESP32 web server will send in response to HTTP requests from web clients.
ESP32 SPIFSS Web Server Web page
This code is an HTML file that defines the layout and content of a web page. The web page contains a heading, a grid of cards, and two buttons. The grid of cards displays information about a specific GPIO (general-purpose input/output) pin on an ESP32 microcontroller, and the buttons allow the user to control the state of the GPIO pin.
The HTML code defines the overall structure of the page, including the head and body sections. The head section contains metadata and links to external resources, such as a style sheet and font library. The body section contains the content of the page, including the heading and grid of cards.
The style section of the code defines the layout and appearance of the page elements. It sets the font family, text alignment, and color of the heading, and defines the appearance of the buttons and cards.
The body of the page contains a heading, a div element with a class of “content”, and a div element with a class of “card-grid”. The “content” div contains the “card-grid” div, which in turn contains several “card” divs. Each “card” div represents a single card in the grid and contains information about a specific GPIO pin, including its state and two buttons for controlling the state of the pin. The %s placeholder in the “card” div indicates that a string value will be inserted at that location in the HTML code when the page is rendered.
<!DOCTYPE html>
<html>
<style>
    html {
        font-family: Arial;
        display: inline-block;
        margin: 0px auto;
        text-align: center;
    }

    h1 {
        color: #070812;
        padding: 2vh;
    }

    .button {
        display: inline-block;
        background-color: #b30000; //red color
        border: none;
        border-radius: 4px;
        color: white;
        padding: 16px 40px;
        text-decoration: none;
        font-size: 30px;
        margin: 2px;
        cursor: pointer;
    }

    .button2 {
        background-color: #364cf4; //blue color
    }

    .content {
        padding: 50px;
    }

    .card-grid {
        max-width: 800px;
        margin: 0 auto;
        display: grid;
        grid-gap: 2rem;
        grid-template-columns: repeat(auto-fit, minmax(200px, 1fr));
    }

    .card {
        background-color: white;
        box-shadow: 2px 2px 12px 1px rgba(140, 140, 140, .5);
    }

    .card-title {
        font-size: 1.2rem;
        font-weight: bold;
        color: #034078
    }
</style>

<head>
    <title>ESP32 WEB SERVER</title>
    <meta name="viewport" content="width=device-width, initial-scale=1">
    <link rel="icon" href="data:,">
    <link rel="stylesheet" href="https://use.fontawesome.com/releases/v5.7.2/css/all.css"
        integrity="sha384-fnmOCqbTlWIlj8LyTjo7mOUStjsKC4pOpQbqyi7RrhN7udi9RwhKkMHpvLbHG9Sr" crossorigin="anonymous">
</head>

<body>
    <h2>ESP32 WEB SERVER</h2>
    <div class="content">
        <div class="card-grid">
            <div class="card">
                <p><i class="fas fa-lightbulb fa-2x" style="color:#c81919;"></i> <strong>GPIO2</strong></p>
                <p>GPIO state: <strong> %s </strong></p>
                <p>
                    <a href="/led2on"><button class="button">ON</button></a>
                    <a href="/led2off"><button class="button button2">OFF</button></a>
                </p>
            </div>
        </div>
    </div>
</body>

</html>
Head over to the folder named ‘main’ and open CMakeLists.txt file. Include the following line at the end of this file and save it.
spiffs_create_partition_image(storage ../data FLASH_IN_PROJECT)ESP32 SPIFFS Web Sever Configuration in ESP-IDF
Now let’s configure some settings for ESP32 and create Kconfig.projbuild file to configure Wi-Fi credentials.
Define Custom Partition File in ESP-IDF
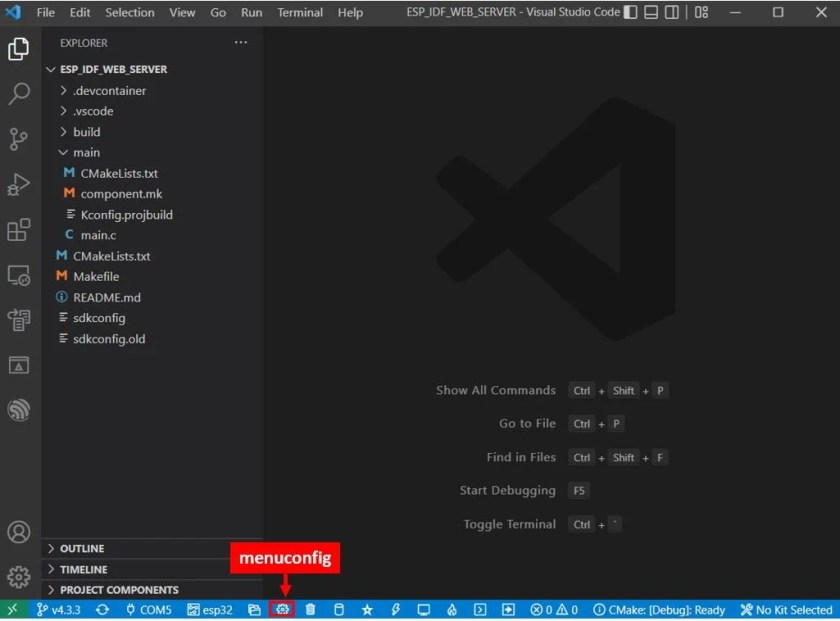
First head over to the menuconfig. Click the icon shown below. It opens the ESP-IDF SDK Configuration Editor.

Scroll down and open the Serial Flasher config. Here you can set the flash SPI mode, flash sampling mode, flash SPI speed, flash size etc. Set the parameters as shown below and save it. Note that we have set the flash size as 4 MB.

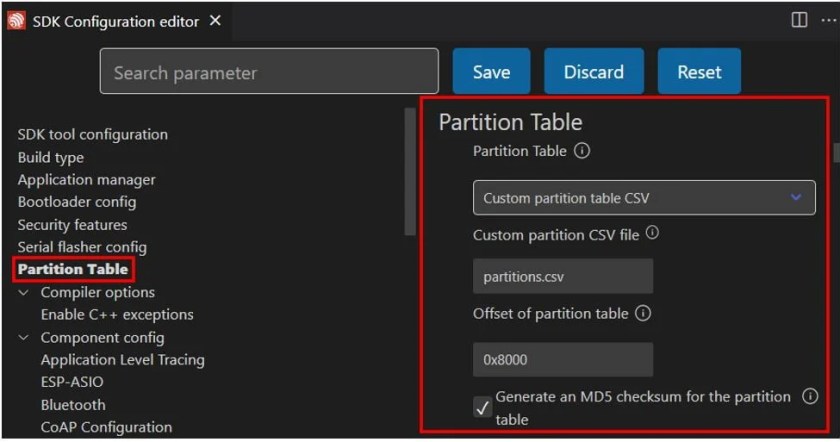
Next scroll down and click Partition Table. Here we will select ‘custom partition table CSV’ option from Partition Table, give the name of the CSV file that we created and the offset of the partition table.
Configure Wi-Fi Credentials
Create a new file named ‘Kconfig.projbuild‘ under the main folder. Copy the code given below in this newly created file.
menu "Example Configuration"

    config ESP_WIFI_SSID
        string "WiFi SSID"
        default "myssid"
        help
            SSID (network name) for the example to connect to.

    config ESP_WIFI_PASSWORD
        string "WiFi Password"
        default "mypassword"
        help
            WiFi password (WPA or WPA2) for the example to use.

    config ESP_MAXIMUM_RETRY
        int "Maximum retry"
        default 5
        help
            Set the Maximum retry to avoid station reconnecting to the AP unlimited when the AP is really inexistent.
endmenu
Now head over to the menuconfig. Click the icon shown below. It opens the ESP-IDF SDK Configuration Editor.
Scroll down and open the Example Configuration. Here we can set the configuration parameters for this example according to our needs. This includes the Wi-Fi SSID, Wi-Fi password, and Maximum retry number. Specify the Wi-Fi SSID and password of your router that the ESP32 board will connect to. By default, the maximum retries are set to 5. You can change it according to your preference. After specifying the configuration parameters, click the Save button on the top.

ESP32 ESP-IDF SPIFFS Web Server Code
This code sets up a simple HTTP server on an ESP32 microcontroller. The server listens for HTTP requests and responds with web page content. The server has three main functions: serving the main web page, turning an LED on, and turning an LED off.
The main web page displays the current state of the LED (either “ON” or “OFF”) and includes two buttons for controlling the LED. When the “ON” button is pressed, the server sends a request to turn the LED on. When the “OFF” button is pressed, the server sends a request to turn the LED off.
Copy this copy to the main.c file in your project.
#include <stdio.h>
#include <stdlib.h>
#include <string.h> //Requires by memset
#include "freertos/FreeRTOS.h"
#include "freertos/task.h"
#include "esp_system.h"
#include "esp_spi_flash.h"
#include <esp_http_server.h>
#include "esp_spiffs.h"

#include "connect_wifi.h"

#define LED_PIN 2


static const char *TAG = "espressif"; // TAG for debug
int led_state = 0;

#define INDEX_HTML_PATH "/spiffs/index.html"
char index_html[4096];
char response_data[4096];

static void initi_web_page_buffer(void)
{
    esp_vfs_spiffs_conf_t conf = {
        .base_path = "/spiffs",
        .partition_label = NULL,
        .max_files = 5,
        .format_if_mount_failed = true};

    ESP_ERROR_CHECK(esp_vfs_spiffs_register(&conf));

    memset((void *)index_html, 0, sizeof(index_html));
    struct stat st;
    if (stat(INDEX_HTML_PATH, &st))
    {
        ESP_LOGE(TAG, "index.html not found");
        return;
    }

    FILE *fp = fopen(INDEX_HTML_PATH, "r");
    if (fread(index_html, st.st_size, 1, fp) == 0)
    {
        ESP_LOGE(TAG, "fread failed");
    }
    fclose(fp);
}

esp_err_t send_web_page(httpd_req_t *req)
{
    int response;
    if(led_state)
    {
        sprintf(response_data, index_html, "ON");
    }
    else
    {
        sprintf(response_data, index_html, "OFF");
    }
    response = httpd_resp_send(req, response_data, HTTPD_RESP_USE_STRLEN);
    return response;
}
esp_err_t get_req_handler(httpd_req_t *req)
{
    return send_web_page(req);
}

esp_err_t led_on_handler(httpd_req_t *req)
{
    gpio_set_level(LED_PIN, 1);
    led_state = 1;
    return send_web_page(req);
}

esp_err_t led_off_handler(httpd_req_t *req)
{
    gpio_set_level(LED_PIN, 0);
    led_state = 0;
    return send_web_page(req);
}

httpd_uri_t uri_get = {
    .uri = "/",
    .method = HTTP_GET,
    .handler = get_req_handler,
    .user_ctx = NULL};

httpd_uri_t uri_on = {
    .uri = "/led2on",
    .method = HTTP_GET,
    .handler = led_on_handler,
    .user_ctx = NULL};

httpd_uri_t uri_off = {
    .uri = "/led2off",
    .method = HTTP_GET,
    .handler = led_off_handler,
    .user_ctx = NULL};

httpd_handle_t setup_server(void)
{
    httpd_config_t config = HTTPD_DEFAULT_CONFIG();
    httpd_handle_t server = NULL;

    if (httpd_start(&server, &config) == ESP_OK)
    {
        httpd_register_uri_handler(server, &uri_get);
        httpd_register_uri_handler(server, &uri_on);
        httpd_register_uri_handler(server, &uri_off);
    }

    return server;
}

void app_main()
{
    // Initialize NVS
    esp_err_t ret = nvs_flash_init();
    if (ret == ESP_ERR_NVS_NO_FREE_PAGES || ret == ESP_ERR_NVS_NEW_VERSION_FOUND)
    {
        ESP_ERROR_CHECK(nvs_flash_erase());
        ret = nvs_flash_init();
    }
    ESP_ERROR_CHECK(ret);

    connect_wifi();
    // GPIO initialization

    if (wifi_connect_status)
    {
        gpio_pad_select_gpio(LED_PIN);
        gpio_set_direction(LED_PIN, GPIO_MODE_OUTPUT);

        led_state = 0;
        ESP_LOGI(TAG, "LED Control SPIFFS Web Server is running ... ...\n");
        initi_web_page_buffer();
        setup_server();
    }
}
Now let’s see how above code works.
First include several headers for various libraries and functions that are used in the program. The functionality of each header files is mentioned below:
“stdio.h” – Standard Input/Output library. This library provides functions for input and output, such as “printf()” and “fopen()”.
“stdlib.h” – Standard Library. This library provides general purpose functions, such as “malloc()” and “exit()”.
“string.h” – String library. This library provides functions for manipulating strings, such as “memset()” and “strlen()”.
“freertos/FreeRTOS.h” – FreeRTOS library. FreeRTOS is an operating system for microcontrollers that allows multiple tasks to run concurrently. This header provides access to the FreeRTOS API.
“freertos/task.h” – FreeRTOS task library. This library provides functions for creating and managing tasks in FreeRTOS, such as “xTaskCreate()” and “vTaskDelete()”.
“esp_system.h” – ESP system library. This library provides functions for accessing system information and performing system-level operations on ESP32 microcontrollers.
“esp_spi_flash.h” – ESP SPI flash library. This library provides functions for accessing the SPI flash memory on ESP32 microcontrollers.
“esp_http_server.h” – ESP HTTP server library. This library provides functions for creating and managing an HTTP web server on ESP32.
“esp_spiffs.h” – ESP SPIFFS library. This library provides functions for accessing the SPIFFS (SPI Flash File System) on ESP32 microcontrollers.
Read index.html content from SPIFSS into a buffer (initi_web_page_buffer)
In ESP32 SPIFFS web server code, the initi_web_page_buffer() function initializes a buffer called “index_html” with the contents of a file called “index.html” stored in SPIFFS (SPI Flash File System).
The function begins by defining a structure called “conf” of type “esp_vfs_spiffs_conf_t” and initializing it with several fields. The “base_path” field specifies the root directory for the SPIFFS filesystem, the “partition_label” field specifies the label of the SPIFFS partition (in this case it is set to NULL), the “max_files” field specifies the maximum number of files that can be open at the same time, and the “format_if_mount_failed” field specifies whether the filesystem should be formatted if it fails to mount.
The function then calls the “esp_vfs_spiffs_register()” function, passing it a pointer to the “conf” structure as an argument. This function mounts the SPIFFS filesystem using the specified configuration.
The function then sets all bytes in the “index_html” buffer to zero using the “memset()” function. It then declares a structure called “st” of type “struct stat” and checks if the file “index.html” exists using the “stat()” function. If the file does not exist, it logs an error message and returns from the function.
static void initi_web_page_buffer(void)
{
    esp_vfs_spiffs_conf_t conf = {
        .base_path = "/spiffs",
        .partition_label = NULL,
        .max_files = 5,
        .format_if_mount_failed = true};

    ESP_ERROR_CHECK(esp_vfs_spiffs_register(&conf));

    memset((void *)index_html, 0, sizeof(index_html));
    struct stat st;
    if (stat(INDEX_HTML_PATH, &st))
    {
        ESP_LOGE(TAG, "index.html not found");
        return;
    }

    FILE *fp = fopen(INDEX_HTML_PATH, "r");
    if (fread(index_html, st.st_size, 1, fp) == 0)
    {
        ESP_LOGE(TAG, "fread failed");
    }
    fclose(fp);
}
Setup HTTP Web Server on ESP32
To create a ESP32 SPIFFS web server, we use httpd_server library available in ESP-IDF. This section of code defines three structures of type “httpd_uri_t” called “uri_get”, “uri_on”, and “uri_off”. These structures represent three different URI (Uniform Resource Identifier) endpoints that the HTTP server can handle.
The “uri_get” structure represents the root URI “/”. It specifies that it handles HTTP “GET” requests and uses the “get_req_handler()” function as the request handler. The “user_ctx” field is set to NULL.
The “uri_on” structure represents the URI “/led2on”. It specifies that it handles HTTP “GET” requests and uses the “led_on_handler()” function as the request handler. The “user_ctx” field is set to NULL.
The “uri_off” structure represents the URI “/led2off”. It specifies that it handles HTTP “GET” requests and uses the “led_off_handler()” function as the request handler. The “user_ctx” field is set to NULL.
The code also defines a function called “setup_server()” that sets up the HTTP server. The function begins by defining a structure called “config” of type “httpd_config_t” and initializing it with the default configuration using the “HTTPD_DEFAULT_CONFIG()” macro. It then declares a variable called “server” of type “httpd_handle_t” and sets it to NULL.
The function then calls the “httpd_start()” function, passing it a pointer to the “server” variable and a pointer to the “config” structure as arguments. If the function returns “ESP_OK”, indicating that the HTTP server was successfully started, the function registers the three URI endpoints using the “httpd_register_uri_handler()” function. It passes the “server” handle and a pointer to each of the “httpd_uri_t” structures as arguments.
Finally, the function returns the “server” handle. This handle can be used to access and manage the HTTP server.
httpd_uri_t uri_get = {
    .uri = "/",
    .method = HTTP_GET,
    .handler = get_req_handler,
    .user_ctx = NULL};

httpd_uri_t uri_on = {
    .uri = "/led2on",
    .method = HTTP_GET,
    .handler = led_on_handler,
    .user_ctx = NULL};

httpd_uri_t uri_off = {
    .uri = "/led2off",
    .method = HTTP_GET,
    .handler = led_off_handler,
    .user_ctx = NULL};

httpd_handle_t setup_server(void)
{
    httpd_config_t config = HTTPD_DEFAULT_CONFIG();
    httpd_handle_t server = NULL;

    if (httpd_start(&server, &config) == ESP_OK)
    {
        httpd_register_uri_handler(server, &uri_get);
        httpd_register_uri_handler(server, &uri_on);
        httpd_register_uri_handler(server, &uri_off);
    }

    return server;
}
HTTP Request Handlers
Next, we need to define HTTP request handlers. These handlers executes whenever ESP32 SPIFFS web server receives request from a web client. This code defines three functions that are used as request handlers for the HTTP server.
The “get_req_handler()” function is used as the request handler for the root URI “/”. It takes a pointer to an “httpd_req_t” structure as an argument, which represents the HTTP request. The function simply calls the “send_web_page()” function and returns the value it returns.
The “led_on_handler()” function is used as the request handler for the URI “/led2on”. It takes a pointer to an “httpd_req_t” structure as an argument, which represents the HTTP request. The function sets the level of the LED on pin 2 to 1 using the “gpio_set_level()” function, sets the global variable “led_state” to 1, and then calls the “send_web_page()” function and returns the value it returns.
The “led_off_handler()” function is used as the request handler for the URI “/led2off”. It takes a pointer to an “httpd_req_t” structure as an argument, which represents the HTTP request. The function sets the level of the LED on pin 2 to 0 using the “gpio_set_level()” function, sets the global variable “led_state” to 0, and then calls the “send_web_page()” function and returns the value it returns. The “send_web_page()” function is explained in the next section.
esp_err_t get_req_handler(httpd_req_t *req)
{
    return send_web_page(req);
}

esp_err_t led_on_handler(httpd_req_t *req)
{
    gpio_set_level(LED_PIN, 1);
    led_state = 1;
    return send_web_page(req);
}

esp_err_t led_off_handler(httpd_req_t *req)
{
    gpio_set_level(LED_PIN, 0);
    led_state = 0;
    return send_web_page(req);
}
ESP32 Web Server HTTP Response Function
These are the two main functions which send response to web clients. This code defines two functions: “send_web_page()” and “get_req_handler()”.
The “send_web_page()” function is used to send a web page to the client in response to an HTTP request. It takes a pointer to an “httpd_req_t” structure as an argument, which represents the HTTP request.
The function begins by declaring a variable “response” of type “int”. It then checks the value of the global variable “led_state”. If it is true, the function uses the “sprintf()” function to format the contents of the “index_html” buffer and the string “ON” into the “response_data” buffer. If “led_state” is false, the function formats the contents of the “index_html” buffer and the string “OFF” into the “response_data” buffer.
The function then calls the “httpd_resp_send()” function, passing it a pointer to the “req” argument, a pointer to the “response_data” buffer, and the value “HTTPD_RESP_USE_STRLEN” as arguments. This sends the contents of the “response_data” buffer as the response to the HTTP request. The function then returns the value returned by the “httpd_resp_send()” function.
The “get_req_handler()” function is used as the request handler for the root URI “/”. It takes a pointer to an “httpd_req_t” structure as an argument, which represents the HTTP request. The function simply calls the “send_web_page()” function and returns the value it returns.
esp_err_t send_web_page(httpd_req_t *req)
{
    int response;
    if(led_state)
    {
        sprintf(response_data, index_html, "ON");
    }
    else
    {
        sprintf(response_data, index_html, "OFF");
    }
    response = httpd_resp_send(req, response_data, HTTPD_RESP_USE_STRLEN);
    return response;
}
esp_err_t get_req_handler(httpd_req_t *req)
{
    return send_web_page(req);
}
ESP32 SPIFFS Web Server Main Function
This is the main function of ESP32 SPIFFS web server. It is responsible for initializing the non-volatile storage (NVS) module of the ESP32 microcontroller, connecting to a WiFi network, and setting up an HTTP server.
The NVS module is initialized by calling the “nvs_flash_init()” function. If this function returns an error indicating that there are no free pages or that a new version of the NVS module has been found, the function calls “nvs_flash_erase()” to erase the NVS module and then calls “nvs_flash_init()” again to initialize it.
After initializing the NVS module, the function calls the “connect_wifi()” function to connect to a WiFi network which is defined in “connect_wifi.h”. If the connection was successful, the function initializes the GPIO pin specified by the “LED_PIN” macro as an output pin, sets its initial state to low, and logs a message to the log. It then calls the “initi_web_page_buffer()” function to initialize the web page buffer and the “setup_server()” function to set up the HTTP server.
void app_main()
{
    // Initialize NVS
    esp_err_t ret = nvs_flash_init();
    if (ret == ESP_ERR_NVS_NO_FREE_PAGES || ret == ESP_ERR_NVS_NEW_VERSION_FOUND)
    {
        ESP_ERROR_CHECK(nvs_flash_erase());
        ret = nvs_flash_init();
    }
    ESP_ERROR_CHECK(ret);

    connect_wifi();
    // GPIO initialization

    if (wifi_connect_status)
    {
        gpio_pad_select_gpio(LED_PIN);
        gpio_set_direction(LED_PIN, GPIO_MODE_OUTPUT);

        led_state = 0;
        ESP_LOGI(TAG, "LED Control SPIFFS Web Server is running ... ...\n");
        initi_web_page_buffer();
        setup_server();
    }
}
ESP32 ESP-IDF SPIFFS Web Server Demo
In this section, we will see a demo of ESP32 ESP-IDF SPIFF web server. First of all download complete project for the following link and build the project.
To flash your chip, type the following command in the serial terminal. Remember to replace the COM port with the one through which your board is connected.
idf.py -p COMX flash monitor
After the code flashes successfully, you can view all the informational logs. First, the station Wi-Fi is initialized. Then we can view the esp_netif_handlers which includes the IP, mask, and gw addresses. Then we get the log “got IP” followed by the ip address. We will use this IP address to access the web server.

Open a new web browser and type the IP address that you obtained in the terminal, then press enter. The ESP32 web server will open up showing two buttons to control GPIO2. Initially, the LED is OFF, which is also displayed on the web sever.
Now press the ON and OFF buttons and the LED will turn ON/OFF accordingly. Likewise, the state of GPIO2 will also continuously update on the web server.


You may also like to read:
- ESP32-CAM ESP-IDF Live Streaming Web Server
- ESP32 BME680 Web Server ESP-IDF
- ESP32 DS18B20 Web Server ESP-IDF
- ESP32 DHT22 Web Server ESP-IDF
- ESP32 BME280 Web Server ESP-IDF
- ESP32 MQTT Publish BME280 Sensor Readings to Node-Red using ESP-IDF
We are a team of experienced Embedded Software Developers with skills in developing Embedded Linux, RTOS, and IoT products from scratch to deployment with a demonstrated history of working in the embedded software industry. Contact us for your projects: admin@esp32tutorials.com
hi this site and your tutorials are very informative. but i couldn’t find connect_wifi.h file. and this example is giving me error that the compiler can’t find this file. can u please help me?
Download complete project from here:
https://github.com/ESP32Tutorials/ESP32-ESP-IDF-SPIFFS-Web-Server
Any idea why I may be getting a seg fault on the ESP32-c3 when I start adding more elements to the HTML? It works fine as written here.
you need to increase buffer size.