In this tutorial, we will learn to create a WebSocket Web server on ESP32 using SPIFFS and ESP-IDF. A WebSocket server is a server that uses the WebSocket protocol to handle WebSocket connections. For demonstration, we will create a web page that can toggle on the board LED of ESP32. This web page also shows the status of LED.
In the last tutorial, we created an HTTP based ESP32 web server where we served the HTML/CSS files to web clients. The disadvantage of using the HTTP server library is that it does not automatically update the state of LED on the web page for all clients if more than one client is connected to a web server. We can resolve this issue by using a WebSocket communication protocol. For example, if multiple clients are connected to a web server and any one client changes the state of GPIO pin, it will automatically notify the state to all connected clients.
With HTTP every request and response cycle with server and client have to send the headers and metadata information which costs additional latency. On the contrary, WebSockets provide a persistent connection and have low latency due to no overhead of re-establishing a connection for each request.
We will program ESP32 with ESP-IDF in VS Code. Before we move ahead, make sure you have the latest version of VS Code installed on your system with the ESP-IDF extension configured.
How Does ESP32 ESP-IDF WebSocket Web Server Work?
This ESP32 WebSocket server provides two main functionalities: serving a web page with a button to toggle the state of an LED and sending the LED state as a WebSocket message to all the connected clients. When the server receives a “toggle” message from any client, the LED state is inverted, and the updated state is then sent back to all the connected clients as a WebSocket message. The server also provides two URIs, “/” and “/ws”, the former is used for serving the web page and the latter is used for WebSocket communications. The client web page is stored in the SPI flash file system and served by the server on the “/” URI.

Users can access the web server by using ESP32 assigned IP address over a local network.

Create ESP32 WebSocket Web Server ESP-IDF Project
In this section, let’s create ESP32 WebSocket Web Server project with ESP-IDF.
Open your VS Code and head over to View > Command Palette. Type ESP-IDF: New Project in the search bar and press enter.
Specify the project name and directory. We have named our project ‘esp32_websocket_server.’ For the ESP-IDF board, we have chosen the custom board option. For ESP-IDF target, choose ESP32 module. Click ‘Choose Template’ button to proceed forward.

In the Extension, select ESP-IDF option:

We will click the ‘sample_project’ under the get-started tab. Now click ‘Create project using template sample_project.’

You will get a notification that the project has been created. To open the project in a new window, click ‘Yes.’
This opens our esp32_websocket_server project that we created inside the EXPLORER tab. There are several folders inside our project folder. This is the same for every project which you will create through ESP-IDF Explorer.
ESP-IDF Create Partition for SPIFFS
In this section, we will create a partition for SPIFFS to store HTML/CSS for web server.
Create a new file and name it as ‘partitions.csv.’ Copy the data given below in that file and save it. We want to add our own custom partition table hence we will be using this file.
# Name,   Type, SubType, Offset,  Size, Flags
# Note: if you change the phy_init or app partition offset, make sure to change the offset in Kconfig.projbuild
nvs,      data, nvs,     ,        0x6000,
phy_init, data, phy,     ,        0x1000,
factory,  app,  factory, ,        1M,
storage,  data, spiffs,  ,        1M
After creating the partitions.csv file, create a folder named ‘data‘ in project directory. Inside that folder create a text file named ‘index.html.’
This index.htm file defines the layout and content of a web page that which ESP32 web server will send in response to HTTP requests from web clients.
ESP32 WebSocket Web Server Web page
This HTML/CSS code setup a web page for an ESP32 WebSocket Server. The page will have a button that says “Toggle LED” and a text that shows the current state of the LED (either “ON” or “OFF”).
The file starts by setting the doctype to HTML and creating the basic structure of an HTML page with the head and body tags. Inside the head tag, there is a title, some meta tags, and a block of CSS that is defining the layout, colors, and styles of the elements of the page.
In the body of the HTML, it starts with a top navigation bar displaying “ESP32 WebSocket Server” and inside that, there is another div with a class named “content” where the card is placed with the button to toggle LED and a text displaying the current state of LED.
In the end, a script block containing JavaScript code is added, where it’s defining a variable “gateway” which is the WebSocket endpoint. There’s an event listener that’s listening for the ‘load’ event of the window and when that event occurs, it calls the function ‘onLoad()’ which calls the function ‘initWebSocket()’ to open a WebSocket connection. There are also other functions called ‘onOpen()’, ‘onClose()’, ‘onMessage()’ etc which are handling the different events that may occur on the WebSocket.
When the ‘Toggle LED’ button is clicked, it sends a message to the ESP32 through the WebSocket to toggle the state of the LED and updates the state text on the page to reflect the current state of the LED.
It also contains a function named ‘initButton()’ which is called in the ‘onLoad()’ function. This function is responsible for initializing the button element on the page and attaching an event listener to it. When the button is clicked, it sends a message through the WebSocket connection to the ESP32 to toggle the state of the LED.
The code also uses the DOM method document.getElementById() to grab references to specific elements on the page, such as the ‘state’ span and the ‘button’ element. This allows the JavaScript code to update the content of these elements and change the state of the LED based on the messages received from the ESP32.
The code also makes use of the console.log() function, which will output messages to the browser’s developer console. This is useful for debugging and understanding the flow of the code.
Overall, this code sets up a simple web page that connects to the ESP32 WebSocket Server and allows you to toggle the state of the LED connected to the ESP32 by clicking a button on the page. The state of the LED is also displayed on the page in real-time.
<!DOCTYPE HTML>
<html>

<head>
    <title>ESP32 Web Server</title>
    <meta name="viewport" content="width=device-width, initial-scale=1">
    <link rel="icon" href="data:,">
    <style>
        html {
            font-family: New Times Roman;
            text-align: center;
        }

        h1 {
            font-size: 1.8rem;
            color: white;
        }

        h2 {
            font-size: 1.5rem;
            font-weight: bold;
            color: #07156d;
        }

        .card {
            background-color: #F8F7F9;
            ;
            box-shadow: 2px 2px 12px 1px rgba(140, 140, 140, .5);
            padding-top: 10px;
            padding-bottom: 20px;
        }

        .topnav {
            overflow: hidden;
            background-color: #04296d;
        }

        body {
            margin: 0;
        }

        .content {
            padding: 30px;
            max-width: 600px;
            margin: 0 auto;
        }

        .button {
            padding: 15px 50px;
            font-size: 24px;
            text-align: center;
            outline: none;
            color: #fff;
            background-color: #0ffa6d; //green
            border: #0ffa6d;
            border-radius: 5px;
            -webkit-touch-callout: none;
            -webkit-user-select: none;
            -khtml-user-select: none;
            -moz-user-select: none;
            -ms-user-select: none;
            user-select: none;
            -webkit-tap-highlight-color: rgba(0, 0, 0, 0);
        }

        .button:active {
            background-color: #fa0f0f;
            transform: translateY(2px);
        }

        .state {
            font-size: 1.5rem;
            color: #120707;
            font-weight: bold;
        }
    </style>
    <title>ESP32 Web Server</title>
    <meta name="viewport" content="width=device-width, initial-scale=1">
    <link rel="icon" href="data:,">
</head>

<body>
    <div class="topnav">
        <h1>ESP32 WebSocket Server</h1>
    </div>
    <div class="content">
        <div class="card">
            <h2>ONBOARD LED GPIO2</h2>
            <p><button id="button" class="button">Toggle LED</button></p>
            <p class="state">State: <span id="state">%s</span></p>
        </div>
    </div>
    </div>
    <script>
        var gateway = `ws://${window.location.hostname}/ws`;
        var websocket;
        window.addEventListener('load', onLoad);
        function initWebSocket() {
            console.log('Trying to open a WebSocket connection...');
            websocket = new WebSocket(gateway);
            websocket.onopen = onOpen;
            websocket.onclose = onClose;
            websocket.onmessage = onMessage; // <-- add this line
        }
        function onOpen(event) {
            console.log('Connection opened');
        }
        function onClose(event) {
            console.log('Connection closed');
            setTimeout(initWebSocket, 2000);
        }
        function onMessage(event) {
            var state;
            console.log(event.data);
            if (event.data == "1") {
                state = "ON";
            }
            else {
                state = "OFF";
            }
            document.getElementById('state').innerHTML = state;
        }
        function onLoad(event) {
            initWebSocket();
            initButton();
        }
        function initButton() {
            document.getElementById('button').addEventListener('click', toggle);
        }
        function toggle() {
            websocket.send('toggle');
        }
    </script>
</body>

</html>
Head over to the folder named ‘main’ and open CMakeLists.txt file. Include the following line at the end of this file and save it.
spiffs_create_partition_image(storage ../data FLASH_IN_PROJECT)ESP32 WebSocket Web Sever Configuration in ESP-IDF
Now let’s configure some settings for ESP32 and create Kconfig.projbuild file to configure Wi-Fi credentials.
Define Custom Partition File in ESP-IDF
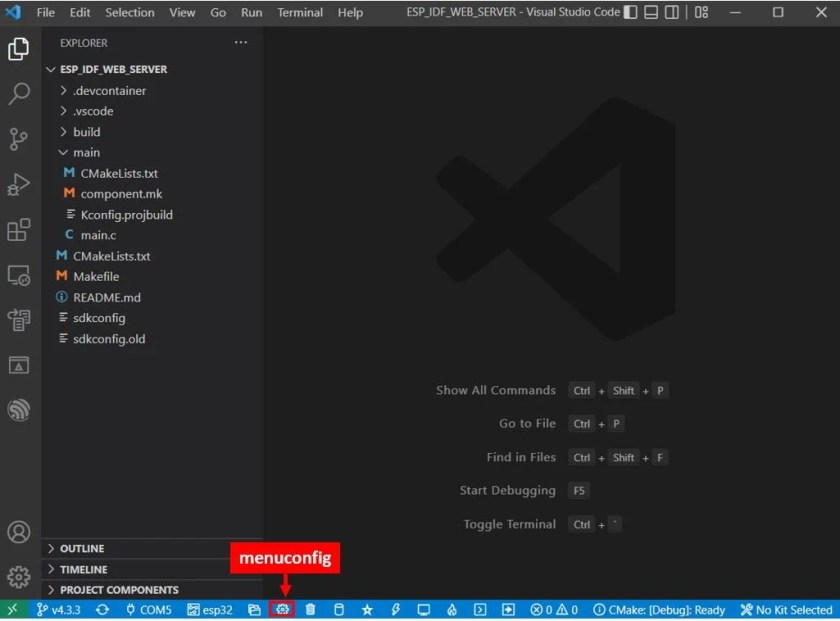
First head over to the menuconfig. Click the icon shown below. It opens the ESP-IDF SDK Configuration Editor.

Scroll down and open the Serial Flasher config. Here you can set the flash SPI mode, flash sampling mode, flash SPI speed, flash size etc. Set the parameters as shown below and save it. Note that we have set the flash size as 4 MB.

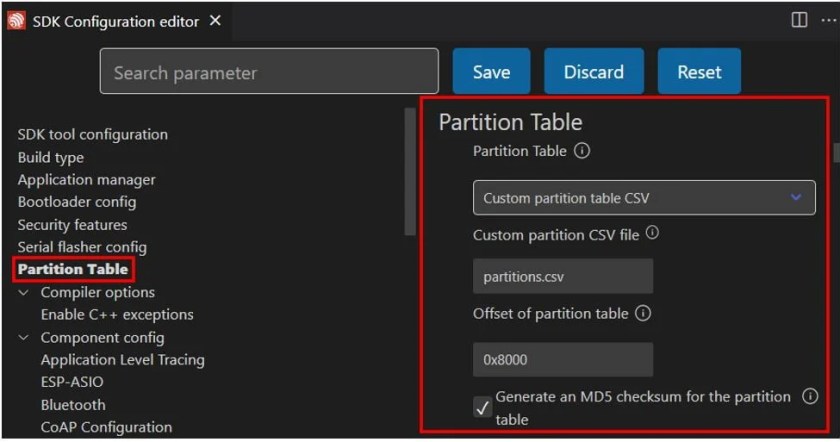
Next scroll down and click Partition Table. Here we will select ‘custom partition table CSV’ option from Partition Table, give the name of the CSV file that we created and the offset of the partition table.
Configure Wi-Fi Credentials
Create a new file named ‘Kconfig.projbuild‘ under the main folder. Copy the code given below in this newly created file.
menu "Example Configuration"

    config ESP_WIFI_SSID
        string "WiFi SSID"
        default "myssid"
        help
            SSID (network name) for the example to connect to.

    config ESP_WIFI_PASSWORD
        string "WiFi Password"
        default "mypassword"
        help
            WiFi password (WPA or WPA2) for the example to use.

    config ESP_MAXIMUM_RETRY
        int "Maximum retry"
        default 5
        help
            Set the Maximum retry to avoid station reconnecting to the AP unlimited when the AP is really inexistent.
endmenu
Now head over to the menuconfig. Click the icon shown below. It opens the ESP-IDF SDK Configuration Editor.
Scroll down and open the Example Configuration. Here we can set the configuration parameters for this example according to our needs. This includes the Wi-Fi SSID, Wi-Fi password, and Maximum retry number. Specify the Wi-Fi SSID and password of your router that the ESP32 board will connect to. By default, the maximum retries are set to 5. You can change it according to your preference. After specifying the configuration parameters, click the Save button on the top.

Enable WebSocket Server Settings
ESP-IDF provides WebSocket server support and it is available under HTTP server library. It is not enabled by default. We need to enable it from menuconfig. Go to setting->HTTP Server and check WebSocker server support.

ESP32 WebSocket Web Server Code ESP-IDF
This code setup ESP32 as a WebSocket Server that serves a web page to a client (web browser) and toggles the state of an LED through that webpage.
#include <stdio.h>
#include <stdlib.h>
#include <string.h>
#include "freertos/FreeRTOS.h"
#include "freertos/task.h"
#include "esp_system.h"
#include "esp_spi_flash.h"
#include <esp_http_server.h>
#include "nvs_flash.h"
#include "esp_spiffs.h"

#include "connect_wifi.h"

#define LED_PIN 2
httpd_handle_t server = NULL;
struct async_resp_arg {
    httpd_handle_t hd;
    int fd;
};

static const char *TAG = "WebSocket Server"; // TAG for debug
int led_state = 0;

#define INDEX_HTML_PATH "/spiffs/index.html"
char index_html[4096];
char response_data[4096];

static void initi_web_page_buffer(void)
{
    esp_vfs_spiffs_conf_t conf = {
        .base_path = "/spiffs",
        .partition_label = NULL,
        .max_files = 5,
        .format_if_mount_failed = true};

    ESP_ERROR_CHECK(esp_vfs_spiffs_register(&conf));

    memset((void *)index_html, 0, sizeof(index_html));
    struct stat st;
    if (stat(INDEX_HTML_PATH, &st))
    {
        ESP_LOGE(TAG, "index.html not found");
        return;
    }

    FILE *fp = fopen(INDEX_HTML_PATH, "r");
    if (fread(index_html, st.st_size, 1, fp) == 0)
    {
        ESP_LOGE(TAG, "fread failed");
    }
    fclose(fp);
}

esp_err_t get_req_handler(httpd_req_t *req)
{
    int response;
    if(led_state)
    {
        sprintf(response_data, index_html, "ON");
    }
    else
    {
        sprintf(response_data, index_html, "OFF");
    }
    response = httpd_resp_send(req, response_data, HTTPD_RESP_USE_STRLEN);
    return response;
}

static void ws_async_send(void *arg)
{
    httpd_ws_frame_t ws_pkt;
    struct async_resp_arg *resp_arg = arg;
    httpd_handle_t hd = resp_arg->hd;
    int fd = resp_arg->fd;

    led_state = !led_state;
    gpio_set_level(LED_PIN, led_state);

    char buff[4];
    memset(buff, 0, sizeof(buff));
    sprintf(buff, "%d",led_state);

    memset(&ws_pkt, 0, sizeof(httpd_ws_frame_t));
    ws_pkt.payload = (uint8_t *)buff;
    ws_pkt.len = strlen(buff);
    ws_pkt.type = HTTPD_WS_TYPE_TEXT;

    static size_t max_clients = CONFIG_LWIP_MAX_LISTENING_TCP;
    size_t fds = max_clients;
    int client_fds[max_clients];

    esp_err_t ret = httpd_get_client_list(server, &fds, client_fds);

    if (ret != ESP_OK) {
        return;
    }

    for (int i = 0; i < fds; i++) {
        int client_info = httpd_ws_get_fd_info(server, client_fds[i]);
        if (client_info == HTTPD_WS_CLIENT_WEBSOCKET) {
            httpd_ws_send_frame_async(hd, client_fds[i], &ws_pkt);
        }
    }
    free(resp_arg);
}

static esp_err_t trigger_async_send(httpd_handle_t handle, httpd_req_t *req)
{
    struct async_resp_arg *resp_arg = malloc(sizeof(struct async_resp_arg));
    resp_arg->hd = req->handle;
    resp_arg->fd = httpd_req_to_sockfd(req);
    return httpd_queue_work(handle, ws_async_send, resp_arg);
}

static esp_err_t handle_ws_req(httpd_req_t *req)
{
    if (req->method == HTTP_GET)
    {
        ESP_LOGI(TAG, "Handshake done, the new connection was opened");
        return ESP_OK;
    }

    httpd_ws_frame_t ws_pkt;
    uint8_t *buf = NULL;
    memset(&ws_pkt, 0, sizeof(httpd_ws_frame_t));
    ws_pkt.type = HTTPD_WS_TYPE_TEXT;
    esp_err_t ret = httpd_ws_recv_frame(req, &ws_pkt, 0);
    if (ret != ESP_OK)
    {
        ESP_LOGE(TAG, "httpd_ws_recv_frame failed to get frame len with %d", ret);
        return ret;
    }

    if (ws_pkt.len)
    {
        buf = calloc(1, ws_pkt.len + 1);
        if (buf == NULL)
        {
            ESP_LOGE(TAG, "Failed to calloc memory for buf");
            return ESP_ERR_NO_MEM;
        }
        ws_pkt.payload = buf;
        ret = httpd_ws_recv_frame(req, &ws_pkt, ws_pkt.len);
        if (ret != ESP_OK)
        {
            ESP_LOGE(TAG, "httpd_ws_recv_frame failed with %d", ret);
            free(buf);
            return ret;
        }
        ESP_LOGI(TAG, "Got packet with message: %s", ws_pkt.payload);
    }

    ESP_LOGI(TAG, "frame len is %d", ws_pkt.len);

    if (ws_pkt.type == HTTPD_WS_TYPE_TEXT &&
        strcmp((char *)ws_pkt.payload, "toggle") == 0)
    {
        free(buf);
        return trigger_async_send(req->handle, req);
    }
    return ESP_OK;
}

httpd_handle_t setup_websocket_server(void)
{
    httpd_config_t config = HTTPD_DEFAULT_CONFIG();

    httpd_uri_t uri_get = {
        .uri = "/",
        .method = HTTP_GET,
        .handler = get_req_handler,
        .user_ctx = NULL};

    httpd_uri_t ws = {
        .uri = "/ws",
        .method = HTTP_GET,
        .handler = handle_ws_req,
        .user_ctx = NULL,
        .is_websocket = true};

    if (httpd_start(&server, &config) == ESP_OK)
    {
        httpd_register_uri_handler(server, &uri_get);
        httpd_register_uri_handler(server, &ws);
    }

    return server;
}

void app_main()
{
    // Initialize NVS
    esp_err_t ret = nvs_flash_init();
    if (ret == ESP_ERR_NVS_NO_FREE_PAGES || ret == ESP_ERR_NVS_NEW_VERSION_FOUND)
    {
        ESP_ERROR_CHECK(nvs_flash_erase());
        ret = nvs_flash_init();
    }
    ESP_ERROR_CHECK(ret);

    connect_wifi();

    if (wifi_connect_status)
    {
        gpio_pad_select_gpio(LED_PIN);
        gpio_set_direction(LED_PIN, GPIO_MODE_OUTPUT);

        led_state = 0;
        ESP_LOGI(TAG, "ESP32 ESP-IDF WebSocket Web Server is running ... ...\n");
        initi_web_page_buffer();
        setup_websocket_server();
    }
}
Now let’s see how this code works?
These headers for libraries specific to the ESP32 that provide various functionalities required for the ESP32 to handle web server and WebSocket related tasks, such as creating and managing network connections, and storing and reading files from flash memory.
#include <stdio.h>
#include <stdlib.h>
#include <string.h>
#include "freertos/FreeRTOS.h"
#include "freertos/task.h"
#include "esp_system.h"
#include "esp_spi_flash.h"
#include <esp_http_server.h>
#include "nvs_flash.h"
#include "esp_spiffs.h"

#include "connect_wifi.h"
Define LED_PIN 2 defines the pin number where the LED is connected.
#define LED_PIN 2
The httpd_handle_t server = NULL; declares a variable server of type httpd_handle_t which is a handle to the WebSocker web server.
httpd_handle_t server = NULL;
struct async_resp_arg {
    httpd_handle_t hd;
    int fd;
};
static const char *TAG = “WebSocket Server”; defines a constant string used for debug purposes.
ESP32 Setup WebSocket EndPoint Web Server
The setup_websocket_server() function sets up and starts an HTTP server with a WebSocket endpoint.
The function starts by defining a httpd_config_t variable named config with default configuration. Next, it defines two httpd_uri_t variables, uri_get and ws. uri_get is the configuration for handling GET requests on the root URL (“/”) and the handler function for this URI is set to get_req_handler().
    httpd_uri_t uri_get = {
        .uri = "/",
        .method = HTTP_GET,
        .handler = get_req_handler,
        .user_ctx = NULL};
ws is the configuration for handling WebSocket requests, the URI for this configuration is set to “/ws”, the method for this URI is set to HTTP_GET, and the handler function for this URI is set to handle_ws_req(), it also sets is_websocket to true, this tells the httpd server that this URI will handle websocket traffic.
 httpd_uri_t ws = {
        .uri = "/ws",
        .method = HTTP_GET,
        .handler = handle_ws_req,
        .user_ctx = NULL,
        .is_websocket = true};
After that, the httpd_start() function is called, passing in the server variable and the config variable. The httpd_start() function sets up the HTTP server with the specified configuration, it returns ESP_OK if the server starts successfully.
if (httpd_start(&server, &config) == ESP_OK)Then it calls `httpd_register_uri after the httpd_start() function, the code calls httpd_register_uri_handler(server, &uri_get); and httpd_register_uri_handler(server, &ws); to register the uri_get and ws variables with the server. This associates the appropriate handler function with the corresponding URI, so that when a request for that URI is received by the server, the corresponding handler function will be called.
The handle_ws_req() function is responsible for handling the WebSocket requests and will handle the opening, closing and handling the data sent over the websocket connection which is explained in the next section. The get_req_handler() function handles the HTTP GET request to the root url and serves the index.html stored in SPIFFS flash memory as a response for initial handshake with clients.
 if (httpd_start(&server, &config) == ESP_OK)
    {
        httpd_register_uri_handler(server, &uri_get);
        httpd_register_uri_handler(server, &ws);
    }
Finally, the setup_websocket_server() function returns the server variable, which is the handle to the server. This handle can be used to access the server and perform tasks like stopping or unregistering URI handlers.
In summary, this function sets up and starts an HTTP server with a WebSocket endpoint, configures it to handle GET requests on the root URL and WebSocket requests on the “/ws” URI, and registers the appropriate handler functions for these URIs with the server. It also starts the HTTP server and returns the server handle
httpd_handle_t setup_websocket_server(void)
{
    httpd_config_t config = HTTPD_DEFAULT_CONFIG();

    httpd_uri_t uri_get = {
        .uri = "/",
        .method = HTTP_GET,
        .handler = get_req_handler,
        .user_ctx = NULL};

    httpd_uri_t ws = {
        .uri = "/ws",
        .method = HTTP_GET,
        .handler = handle_ws_req,
        .user_ctx = NULL,
        .is_websocket = true};

    if (httpd_start(&server, &config) == ESP_OK)
    {
        httpd_register_uri_handler(server, &uri_get);
        httpd_register_uri_handler(server, &ws);
    }

    return server;
}
WebSocket Received Frames Handler Function
This function handle_ws_req(httpd_req_t *req) is responsible for handling WebSocket requests that are sent to the server from all web clients.
static esp_err_t handle_ws_req(httpd_req_t *req)
The function starts by checking if the request’s method is HTTP_GET, if yes, it prints a message indicating that the handshake is done, the WebSocket connection was opened and the function returns ESP_OK. Because WebSocket web servers start initial communication with HTTP handshake and then it follows WebSocket communication protocol.
 if (req->method == HTTP_GET)
    {
        ESP_LOGI(TAG, "Handshake done, the new connection was opened");
        return ESP_OK;
    }
If the request’s method is not HTTP_GET, it means that the request is sending WebSocket data frames. The function then declares a variable ws_pkt of type httpd_ws_frame_t and a variable buf of type uint8_t pointers, which will be used to store the data frames. It then sets the fields of the ws_pkt variable to zero and sets the type to HTTPD_WS_TYPE_TEXT.
 httpd_ws_frame_t ws_pkt;
 uint8_t *buf = NULL;
 memset(&ws_pkt, 0, sizeof(httpd_ws_frame_t));
 ws_pkt.type = HTTPD_WS_TYPE_TEXT;
The function then calls httpd_ws_recv_frame(req, &ws_pkt, 0) to receive the WebSocket data frame and store it in the ws_pkt variable. This function returns ESP_OK if the data frame is received successfully and stores the length of the data frame in the ws_pkt.len field. If the function returns an error, the function logs the error and returns it.
esp_err_t ret = httpd_ws_recv_frame(req, &ws_pkt, 0);
    if (ret != ESP_OK)
    {
        ESP_LOGE(TAG, "httpd_ws_recv_frame failed to get frame len with %d", ret);
        return ret;
    }
If the received data frame has a non-zero length, the function calls calloc(1, ws_pkt.len + 1) to allocate memory for the buf variable, which will be used to store the data frame’s payload. It then calls httpd_ws_recv_frame(req, &ws_pkt, ws_pkt.len) again to retrieve the data frame’s payload and store it in the buf variable. The function logs the message received and the length of the frame.
 if (ws_pkt.len)
    {
        buf = calloc(1, ws_pkt.len + 1);
        if (buf == NULL)
        {
            ESP_LOGE(TAG, "Failed to calloc memory for buf");
            return ESP_ERR_NO_MEM;
        }
        ws_pkt.payload = buf;
        ret = httpd_ws_recv_frame(req, &ws_pkt, ws_pkt.len);
        if (ret != ESP_OK)
        {
            ESP_LOGE(TAG, "httpd_ws_recv_frame failed with %d", ret);
            free(buf);
            return ret;
        }
        ESP_LOGI(TAG, "Got packet with message: %s", ws_pkt.payload);
    }

    ESP_LOGI(TAG, "frame len is %d", ws_pkt.len);
Finally, the function checks whether the received message is “toggle” and if it is, it calls the trigger_async_send(req->handle, req) function and returns ESP_OK.
if (ws_pkt.type == HTTPD_WS_TYPE_TEXT &&
        strcmp((char *)ws_pkt.payload, "toggle") == 0)
    {
        free(buf);
        return trigger_async_send(req->handle, req);
    }
    return ESP_OK
In summary, this function handles the WebSocket request by handling the WebSocket data frames, receiving the message sent in the request, and handling the message, by sending an asynchronous message to all connected clients.
static esp_err_t handle_ws_req(httpd_req_t *req)
{
    if (req->method == HTTP_GET)
    {
        ESP_LOGI(TAG, "Handshake done, the new connection was opened");
        return ESP_OK;
    }

    httpd_ws_frame_t ws_pkt;
    uint8_t *buf = NULL;
    memset(&ws_pkt, 0, sizeof(httpd_ws_frame_t));
    ws_pkt.type = HTTPD_WS_TYPE_TEXT;
    esp_err_t ret = httpd_ws_recv_frame(req, &ws_pkt, 0);
    if (ret != ESP_OK)
    {
        ESP_LOGE(TAG, "httpd_ws_recv_frame failed to get frame len with %d", ret);
        return ret;
    }

    if (ws_pkt.len)
    {
        buf = calloc(1, ws_pkt.len + 1);
        if (buf == NULL)
        {
            ESP_LOGE(TAG, "Failed to calloc memory for buf");
            return ESP_ERR_NO_MEM;
        }
        ws_pkt.payload = buf;
        ret = httpd_ws_recv_frame(req, &ws_pkt, ws_pkt.len);
        if (ret != ESP_OK)
        {
            ESP_LOGE(TAG, "httpd_ws_recv_frame failed with %d", ret);
            free(buf);
            return ret;
        }
        ESP_LOGI(TAG, "Got packet with message: %s", ws_pkt.payload);
    }

    ESP_LOGI(TAG, "frame len is %d", ws_pkt.len);

    if (ws_pkt.type == HTTPD_WS_TYPE_TEXT &&
        strcmp((char *)ws_pkt.payload, "toggle") == 0)
    {
        free(buf);
        return trigger_async_send(req->handle, req);
    }
    return ESP_OK;
}
WebSocket Frames Response Sender Function
The following two functions responds to WebSocket and send frames to all connected clients. The ws_async_send function is responsible for handling the sending of data over the web socket connection to clients. This function is triggered when trigger_async_send function is called.
static void ws_async_send(void *arg)
static esp_err_t trigger_async_send(httpd_handle_t handle, httpd_req_t *req)
The trigger_async_send function is responsible for triggering the ws_async_send function by allocating the memory for struct async_resp_arg, filling it with the server handle and file descriptor of the web socket connection and then queuing the ws_async_send function using the httpd_queue_work function and passing the server handle, the ws_async_send function and the pointer to the resp_arg structure as its arguments.
static esp_err_t trigger_async_send(httpd_handle_t handle, httpd_req_t *req)
{
    struct async_resp_arg *resp_arg = malloc(sizeof(struct async_resp_arg));
    resp_arg->hd = req->handle;
    resp_arg->fd = httpd_req_to_sockfd(req);
    return httpd_queue_work(handle, ws_async_send, resp_arg);
}
The ws_async_send function takes in a void pointer arg as an input parameter which is the pointer to struct async_resp_arg that contains the web server handle and the file descriptor of the connection. The function performs the following steps :
- Toggles the state of the led_state variable, which keeps track of the state of the LED.
- Updates the state of the led according to the led_state.
- Formats a string buff with the current led_state and makes the payload of the web socket packet.
- Sends the packet to all the connected clients using the httpd_ws_send_frame_async function, and passing the web server handle, file descriptor and the web socket packet.
- Finally it frees up the memory allocated for the resp_arg structure.
In this code, ws_async_send is a function that is called asynchronously to send a WebSocket message to all connected clients. It takes one argument, which is a pointer to a struct async_resp_arg that contains information about the current connection.
httpd_ws_frame_t ws_pkt;
struct async_resp_arg *resp_arg = arg;
httpd_handle_t hd = resp_arg->hd;
int fd = resp_arg->fd;
The function first inverts the state of the LED by setting led_state = !led_state and also sets the state of the LED pin to this value using the gpio_set_level function. Then, it creates a buffer buff of size 4 and uses sprintf to write the value of led_state as a string into this buffer.
led_state = !led_state;
gpio_set_level(LED_PIN, led_state);
Then it creates a httpd_ws_frame_t struct named ws_pkt and sets its payload to point to the buff and len to the length of the string stored in buff, also sets the type of the message to HTTPD_WS_TYPE_TEXT.
 memset(&ws_pkt, 0, sizeof(httpd_ws_frame_t));
 ws_pkt.payload = (uint8_t *)buff;
 ws_pkt.len = strlen(buff);
 ws_pkt.type = HTTPD_WS_TYPE_TEXT;
The function then gets the list of connected clients and iterates through the list, sending the ws_pkt message to all clients whose connection type is HTTPD_WS_CLIENT_WEBSOCKET.
static size_t max_clients = CONFIG_LWIP_MAX_LISTENING_TCP;
    size_t fds = max_clients;
    int client_fds[max_clients];

    esp_err_t ret = httpd_get_client_list(server, &fds, client_fds);

    if (ret != ESP_OK) {
        return;
    }

    for (int i = 0; i < fds; i++) {
        int client_info = httpd_ws_get_fd_info(server, client_fds[i]);
        if (client_info == HTTPD_WS_CLIENT_WEBSOCKET) {
            httpd_ws_send_frame_async(hd, client_fds[i], &ws_pkt);
        }
    }
Finally, it frees the memory of resp_arg struct by free(resp_arg);
free(resp_arg);
WebSocket Initial HTTP Handshake Handler
As discussed earlier, the WebSocket web servers start initial communication with HTTP handshake and then it follows WebSocket communication protocol. Therefore, we need to setup a HTTP GET request handler.
The “get_req_handler()” function is used to send a web page to the client in response to an HTTP request. It takes a pointer to an “httpd_req_t” structure as an argument, which represents the HTTP request.
The function begins by declaring a variable “response” of type “int”. It then checks the value of the global variable “led_state”. If it is true, the function uses the “sprintf()” function to format the contents of the “index_html” buffer and the string “ON” into the “response_data” buffer. If “led_state” is false, the function formats the contents of the “index_html” buffer and the string “OFF” into the “response_data” buffer.
The function then calls the “httpd_resp_send()” function, passing it a pointer to the “req” argument, a pointer to the “response_data” buffer, and the value “HTTPD_RESP_USE_STRLEN” as arguments. This sends the contents of the “response_data” buffer as the response to the HTTP request. The function then returns the value returned by the “httpd_resp_send()” function.
The “get_req_handler()” function is used as the request handler for the root URI “/”. It takes a pointer to an “httpd_req_t” structure as an argument, which represents the HTTP request. The function simply calls the “send_web_page()” function and returns the value it returns.
esp_err_t get_req_handler(httpd_req_t *req)
{
    int response;
    if(led_state)
    {
        sprintf(response_data, index_html, "ON");
    }
    else
    {
        sprintf(response_data, index_html, "OFF");
    }
    response = httpd_resp_send(req, response_data, HTTPD_RESP_USE_STRLEN);
    return response;
}
Read index.html content from SPIFSS into a buffer (initi_web_page_buffer)
In ESP32 WebSocket web server code, the initi_web_page_buffer() function initializes a buffer called “index_html” with the contents of a file called “index.html” stored in SPIFFS (SPI Flash File System).
The function begins by defining a structure called “conf” of type “esp_vfs_spiffs_conf_t” and initializing it with several fields. The “base_path” field specifies the root directory for the SPIFFS filesystem, the “partition_label” field specifies the label of the SPIFFS partition (in this case it is set to NULL), the “max_files” field specifies the maximum number of files that can be open at the same time, and the “format_if_mount_failed” field specifies whether the filesystem should be formatted if it fails to mount.
The function then calls the “esp_vfs_spiffs_register()” function, passing it a pointer to the “conf” structure as an argument. This function mounts the SPIFFS filesystem using the specified configuration.
The function then sets all bytes in the “index_html” buffer to zero using the “memset()” function. It then declares a structure called “st” of type “struct stat” and checks if the file “index.html” exists using the “stat()” function. If the file does not exist, it logs an error message and returns from the function.
static void initi_web_page_buffer(void)
{
    esp_vfs_spiffs_conf_t conf = {
        .base_path = "/spiffs",
        .partition_label = NULL,
        .max_files = 5,
        .format_if_mount_failed = true};

    ESP_ERROR_CHECK(esp_vfs_spiffs_register(&conf));

    memset((void *)index_html, 0, sizeof(index_html));
    struct stat st;
    if (stat(INDEX_HTML_PATH, &st))
    {
        ESP_LOGE(TAG, "index.html not found");
        return;
    }

    FILE *fp = fopen(INDEX_HTML_PATH, "r");
    if (fread(index_html, st.st_size, 1, fp) == 0)
    {
        ESP_LOGE(TAG, "fread failed");
    }
    fclose(fp);
}
ESP32 ESP-IDF WebSocket Web Server Demo
In this section, we will see a demo of ESP32 ESP-IDF WebSocket web server. First of all download complete project for the following link and build the project.
To flash your chip, type the following command in the serial terminal. Remember to replace the COM port with the one through which your board is connected.
idf.py -p COMX flash monitor
After the code flashes successfully, you can view all the informational logs. First, the station Wi-Fi is initialized. Then we can view the esp_netif_handlers which includes the IP, mask, and gw addresses. Then we get the log “got IP” followed by the ip address. We will use this IP address to access the web server.

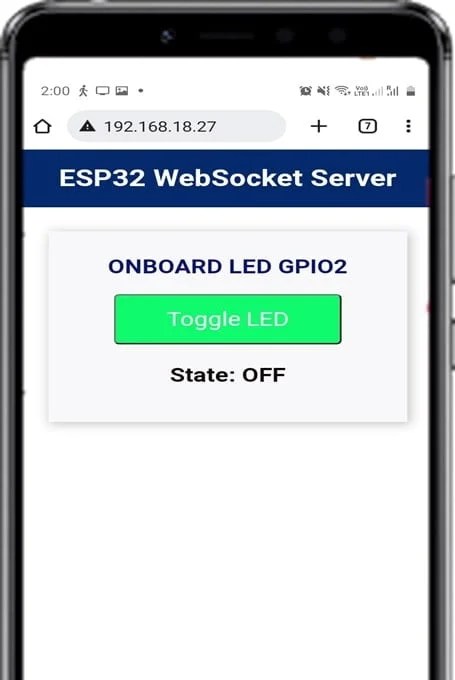
Open a new web browser and type the IP address that you obtained in the terminal, then press enter. The ESP32 WebSocket web server will open up showing web page to toggle onboard LED of ESP32 (GPIO2). Initially, the LED is OFF, and state is also displayed on the web sever.
Now toggle the button and the LED will turn ON/OFF accordingly. Likewise, the state of GPIO2 will also continuously update on the web server.
Now if you use multiple clients with ESP32 web server and toggle the state of LED from any client then the LED state will also be reflected on all clients as shown below:
In summary
In conclusion, the provided code is a simple implementation of a WebSocket server using the ESP32 microcontroller. The WebSocket server is created using the ESP-IDF framework and the lwIP library, and it is based on the HTTP server. The server provides two main functionalities: serving a web page with a button to toggle the state of an LED and sending the LED state as a WebSocket message to all the connected clients. When the server receives a “toggle” message from the client, the LED state is inverted, and the updated state is then sent back to all the connected clients as a WebSocket message. The server also provides two URIs, “/” and “/ws”, the former is used for serving the web page and the latter is used for WebSocket communications. The client web page is stored in the file system and served by the server on the “/” URI.
You may also like to read:
- ESP32 ESP-IDF SPIFFS Web Server
- ESP32-CAM ESP-IDF Live Streaming Web Server
- ESP32 BME680 Web Server ESP-IDF
- ESP32 DS18B20 Web Server ESP-IDF
- ESP32 DHT22 Web Server ESP-IDF
- ESP32 BME280 Web Server ESP-IDF
- ESP32 MQTT Publish BME280 Sensor Readings to Node-Red using ESP-IDF
We are a team of experienced Embedded Software Developers with skills in developing Embedded Linux, RTOS, and IoT products from scratch to deployment with a demonstrated history of working in the embedded software industry. Contact us for your projects: admin@esp32tutorials.com
I got the error: “E (24904) SPIFFS: spiffs partition could not be found” which is weird because the SPIFFS web server (without a websocket server) worked for me.
I found the error: you simply go into menuconfig and make sure “(partitions.csv) Custom partition CSV file” is displayed. You can add it by going into “Partition Table (Custom partition table CSV) —>” and selecting “Custom partition table CSV”.
It works perfectly on the PC as demonstrated on the video. But with one of the client being a mobile phone, it rises the following error on the vs code terminal:
W (760358) httpd_txrx: httpd_resp_send_err: 431 Request Header Fields Too Large – Header fields are too long for server to interpret.
I belive I tested it on both Mobiles and Desktop browsers, I will test again and come back to you.
any news over there?
menuconfig – component config – http server – Max HTTP Request Header Length – 1024
That solved the issue! Thank you!
I have been using the esp-idf for about 1 1/2 years and had no problems learning it. The idf is about using event handlers, callbacks along with freeRtos. I got all that. Now that I am getting into the web development understanding the code got a lot harder. I know what causes an led to blink but understanding the web protocols are much harder.
I may have to go back to the arduino-esp32 core because I am a maker not a programmer. I compared the same application using esp-arduino vs esp-idf and the web stuff is much more abstracted and easier to understand using arduino. You have an awesome site and has helped me a lot, thank you
Thanks Joseph.
The data folder in the project is named spiffs_data, so the command in the cmake file should be spiffs_create_partition_image(storage ../spiffs_data FLASH_IN_PROJECT).
How to estabilish a communication between devices , which are connected to different access points? I tried to simulate this scenario but got no success… and I got interested to know how to do that, once the communication on the web is often between devices , which are at different networks.
Gera esse erro: FAILED: partition_table/partition-table.bin
he command in the cmake file should be spiffs_create_partition_image(storage ../spiffs_data FLASH_IN_PROJECT).
You explain very clear. Hope you have mode tutorial, you do not update from 18 Feb.
Thank you so much!
Thank you very much for the tutorial. I would like to do the same (Websocket Web Server using SPIFFS) but configure the ESP32 as a softAP, so that I can connect to the ESP32 by entering the WiFi credentials on my laptop. I was able to configure the softAP by changing the “connect_wifi.c” accordingly and I was able to connect to the ESP32. However, when I enter the IP address, the page is not found. Can you please help me with that? Thanks.
Anyone run into issues with the system seg faulting when connecting after adding more elements to index.html?
Hello,
First of all, thank you for the tutorial. I tried to run JavaScript code in a separate JS file for project, but I wasn’t successful. I’m requesting your assistance.
Thank you